FREE SHIPPING ON ALL ORDERS OVER $150!

Epoxy Resin Flower Preservations Guide - Superclear Epoxy Resin Systems
Epoxy resin floral preservation pieces

How to Make Epoxy Resin Flower Preservations 

What is a Flower Preservation? 

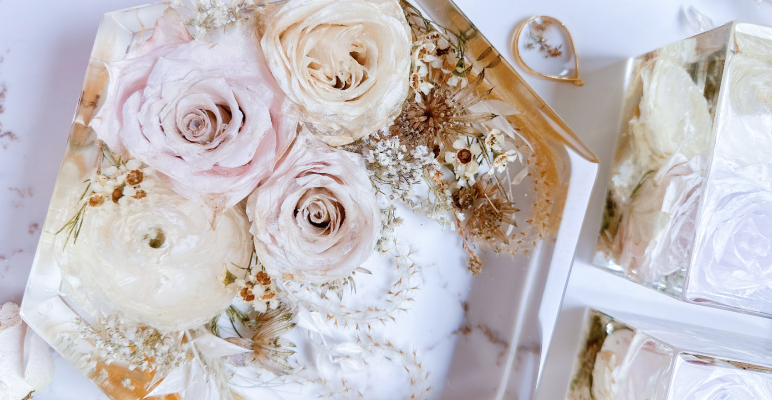
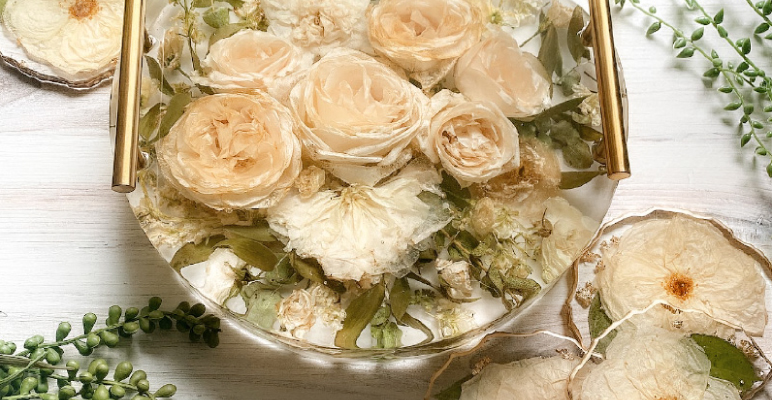
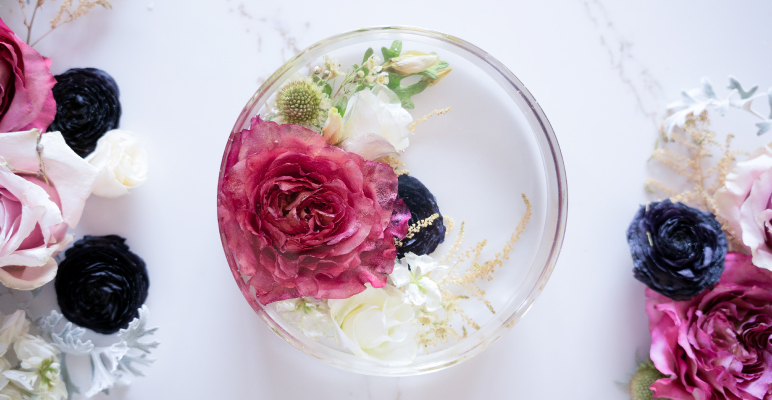
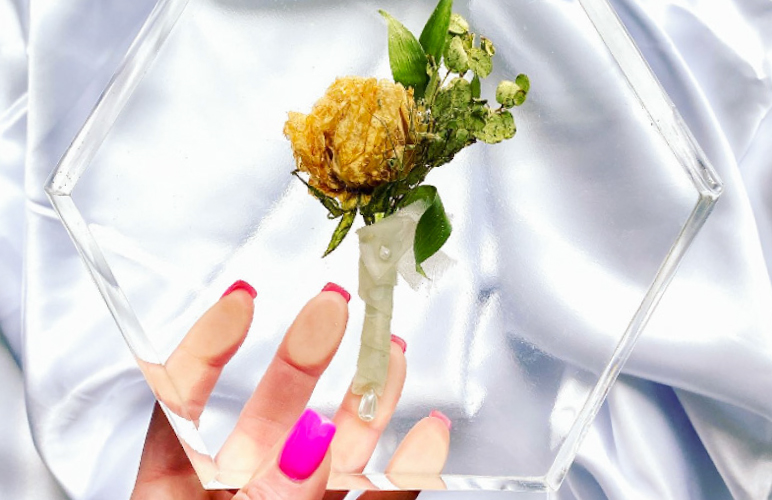
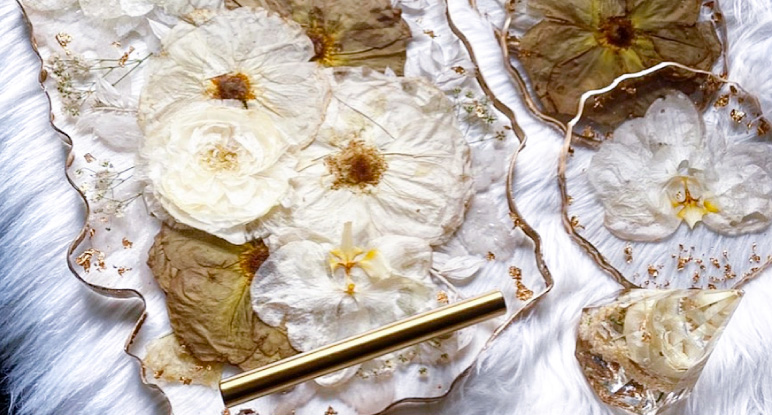
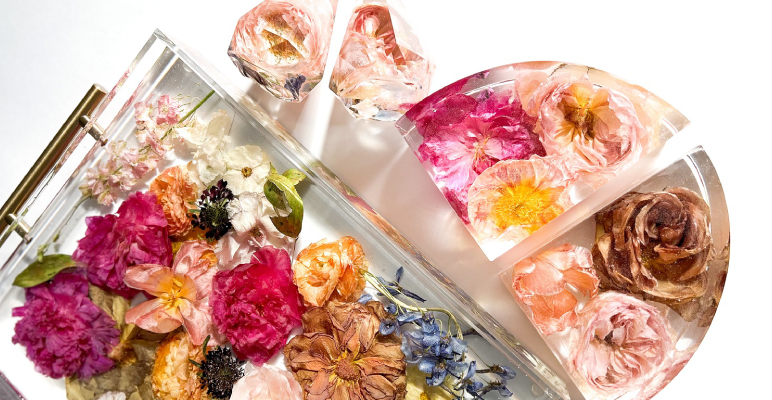
Flower preservations retain the color, shape, and freshness of a floral arrangement without the need for sunlight or water. One of the most popular flower preservation methods uses epoxy resin to permanently encase flowers from events like weddings, funerals, birthdays, holidays, and so on. Epoxy resin flower preservations can come as serving trays, bookends, coasters, and decor pieces. 

Best Resin for Floral Preservations 

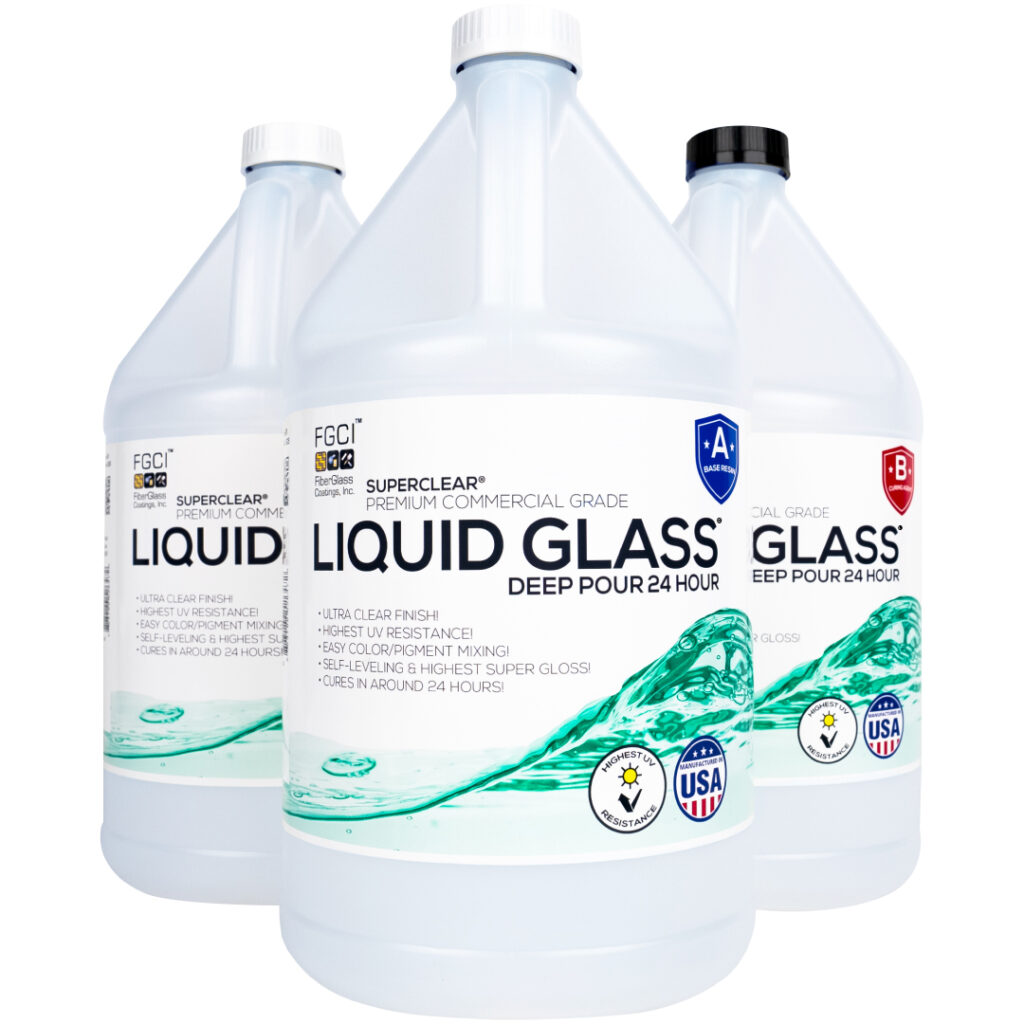
Deep pour epoxies are the best products to efficiently cast and protect flowers for epoxy resin flower preservations. At Superclear®, we manufacture two types of deep pour epoxies designed to meet the specific needs of your application! 

Liquid Glass® Deep Pour Epoxy

If you’re looking to pour epoxy several inches thick at one time, Liquid Glass® Deep Pour is the way to go. Depending on ambient temperature and volume, this deep pour epoxy can be poured up to 4 inches thick at a time – much thicker than our competitors! Its slower cure time makes it a safe option for casting delicate flowers without wilting the petals. 

  • Pour between 1/2 to 4 inches thick at a time* 
  • Does not discolor petals 
  • 72 hour cure time 
  • Perfect for large molds with greater volumes 

24 Hour Deep Pour Epoxy

24 Hour Deep Pour Epoxy is the perfect product for floral preservationists that rely on faster curing times. Ready to demold in just 24 to 36 hours, this deep pour epoxy will majorly cut down the production time on your floral projects while maintaining the depth and clarity of each pour. 

  • Pour between 1/4 and 1 inch thick* 
  • Protects flowers from deteriorating 
  • 24 to 36 hour cure time 
  • Perfect for small to medium sized molds 


Learn more about different applications for Deep Pour Epoxies in the Deep Pour Epoxy Beginning Guide!

*Depending on ambient temperature & volumes

Kaycee Keller hexagon casting and flower preservations

How to Make Resin Flower Preservations

We worked with Kaycee Keller from KK Resin Art to uncover the best tips and tricks for epoxy resin floral preservations. Check out the guide below to see how you can get started! 

Materials Required

Kaycee Keller round floral preservation and coasters

Steps to Make a Flower Preservation 

Step 1: Prepare the Flowers

Flowers tend to hold a lot of moisture, so it is necessary to fully dry them before casting in epoxy resin. The most effective way to do this is to use silica. In floral preservations, silica gel absorbs moisture very quickly without causing the color of flower petals to fade or change. Kaycee prefers to use silica sand to ensure every nook of the flower is free of moisture. However, silica beads can be easier to work with, as the beads will not get stuck in the folds of flowers like silica sand will. 

Kaycee starts by gently pulling apart petals to allow silica sand to get inside the flower, ensuring every petal is fully dried. Then, she fills a Tupperware container an inch thick with silica sand and places the flowers inside. Once every flower is set in the container, Kaycee slowly pours silica inside and all around the flowers until they are completely covered. 

PRO TIP: Kaycee recommends pressing greenery or leaves in books for up to 3 weeks to fully dry. 

Step 2: Allow the Flowers to Dry

Depending on the silica and the type of flowers, it can take seven days or more to fully remove all moisture. Once the flowers are completely dry, Kaycee removes them from the Tupperware container and gently shakes them to cause all silica to fall out. It can be helpful to dust off any remaining sand or beads with a soft bristle brush. 

Step 3: Design the Layout

Once your flowers are completely dry, you can start designing the layout of your preservation piece. Set your flowers in the mold and decide how you want the final layout to look. 

PRO TIP: Take a picture of the final layout for reference later on! 

Step 4: Pour the First Layer of Epoxy Resin

After you finalize the layout of the piece, remove all flowers from the mold and clean with Isopropyl Alcohol (90% or higher) or Superclean. Then, mix and pour a thin layer of epoxy into the mold. Kaycee uses Liquid Glass® Deep Pour at 1/2 inches thick, but you can also use Superclear® Table Top Epoxy if you want to do a thinner pour at 1/4 inches or less.

PRO TIP: If your epoxy has a thick consistency, warm the base resin and curing agent bottles in a hot water bath (130 degrees Fahrenheit) until they come up to temperature. Then, let the contents of the containers cool back down to room temperature (70-75 degrees Fahrenheit). This will thin the epoxy and remove any bubbles before mixing.  

Bloom and Keep Co circle casting flower preservation

Step 5: Place Flowers in the Mold

Once your first layer of epoxy has been poured, place all flowers in the mold according to your desired layout. Kaycee recommends starting with the greenery and flat pieces first to create a background. Then, she moves on to the larger flowers and finishes with smaller, filler florals. To create a thicker barrier between the bottom layer of epoxy and the flowers, allow the epoxy to get hard and tacky before placing your flowers into the mold. 

PRO TIP: If bubbles appear in the first hour of your pour, use a small toothpick to prod them loose! 

Step 6: Pour the Second Layer of Epoxy Resin

To add the next layer of epoxy over the flowers, wait until the first layer has almost cured, but still has a tacky, adhesive feel to it. Then, mix and pour epoxy over the slightly tacky layer to create a chemical bond between the two layers. When using Liquid Glass® Deep Pour, Kaycee likes to pour her layers around 1 ½ inches thick at a time so that she can easily pop any bubbles that come up. Continue layering in this manner as needed until the resin completely covers the flowers. 

Step 7: Allow the Epoxy Resin to Fully Cure

Depending on the type of deep pour epoxy you use for your floral preservation, it could take 24 to 72 hours to fully cure. For best results, make sure the epoxy is completely hard and smooth before removing it from the mold. 

Step 8: Remove Floral Preservation from the Mold

Once cured, carefully remove your flower preservation from the mold. Be careful, as there can be sharp edges on the epoxy. Kaycee will add a small amount of water into the mold to help remove the piece easier. 

Step 9: Sand Down Sharp Edges and Flood Coat

Flood coating is a technique that adds a final glossy coat to the floral preservation. First, use fine grit sandpaper to sand any sharp edges or imperfections off the project. Be sure to lightly sand all surfaces of the epoxy as well to allow for a strong bond between your deep pour and the flood coat. Once the project has been sanded smooth, Kaycee uses Superclear® Table Top Epoxy as a flood coat. If needed, use a heat gun one or two times to remove any bubbles. The table top epoxy will self level at around 1/16th to 1/32nd of an inch. 

PRO TIP: Some floral preservation artists apply liquid latex to the bottom of their pieces to easily remove any epoxy drips after the flood coat has fully dried! 

Step 10: Buff and Polish for Extra Clarity & Shine

Once the Superclear® flood coat is completely cured, use a small block sander to smooth any sharp edges or sides. Then, use a high gloss wax finish to buff and polish the epoxy back up to clarity. Once you’re satisfied with how it looks, your floral preservation piece is done!

Kaycee Keller clear floral preservation hexagon

FAQs 

Can you preserve fresh flowers in epoxy resin? 

Make sure your fresh flowers are fully dried and sealed prior to casting them in epoxy. We recommend using silica beads to remove moisture, and Superclear® Table Top Epoxy or hairspray to seal the flowers.  

How long do flowers in epoxy resin last? 

When done correctly, flowers will stand the test of time in epoxy resin for years to come. This makes it the ideal method of floral preservation for events like weddings, birthdays, Valentine’s Day, and much more! 

Do you need to dry flowers before putting them in epoxy resin?

You should always dry flowers before putting them in epoxy resin. If there is any moisture trapped in the flowers, it will cause the epoxy to look cloudy or have microbubbles. For best results, dry them for at least a week in silica beads

What do you use to seal flowers before casting in epoxy resin? 

Once your flowers are completely dry, make sure to seal them to prevent any dyes or air from escaping into the epoxy resin. Superclear® Table Top Epoxy works as an excellent sealant, but hairspray can also work in a pinch. 

What kind of epoxy resin should I use for flowers? 

Superclear® deep pour epoxies are the best resin for flower preservations. Liquid Glass® Deep Pour is perfect for thick, large volume pours, and 24 Hour Deep Pour is ideal for pours that need to cure faster, no more than 1 inch thick at a time.

Conclusion

Epoxy resin flower preservations are the perfect way to keep your floral arrangement around for years to come! With the right materials, you can create a timeless, crystal clear, long-lasting casting project to preserve your flowers. By following Kaycee’s recommended steps, you can use Superclear® epoxy to make a beautiful epoxy resin flower preservation! 

Superclear Epoxy Systems

About the Artist

KK Resin Art
Etsy
Instagram

Kaycee Keller aka @kkresinart is a self-taught resin artist from the Pacific Northwest. She first started experimenting with this medium in 2018, there were a lot of failures and few small victories.

Creating a diy geode wall art for her own home turned into a full-time floral preservation business for her today. She credits her success to partnering with companies like SuperClear® epoxy that helped encourage her along the way, leading to where she is today.

Kaycee Keller flower preservation tray coaster ring holder
Liquid Glass Deep Pour Epoxy 3 Gallon Kit
Deep Pour 24 Hour Epoxy 3 Gallon Kit

Leave a Reply

Your email address will not be published. Required fields are marked *

Fill out this field
Fill out this field
Please enter a valid email address.
You need to agree with the terms to proceed

Menu