FREE SHIPPING ON ALL ORDERS OVER $150!

Table Top Epoxy Guide - Superclear Epoxy Resin Systems

Everything You Need to Know About Table Top Epoxy

Introduction

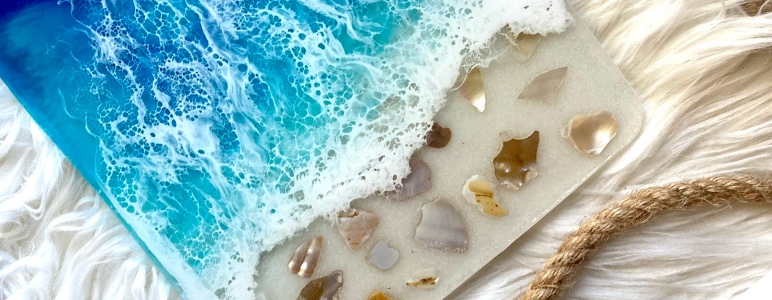
What is Table Top Epoxy?

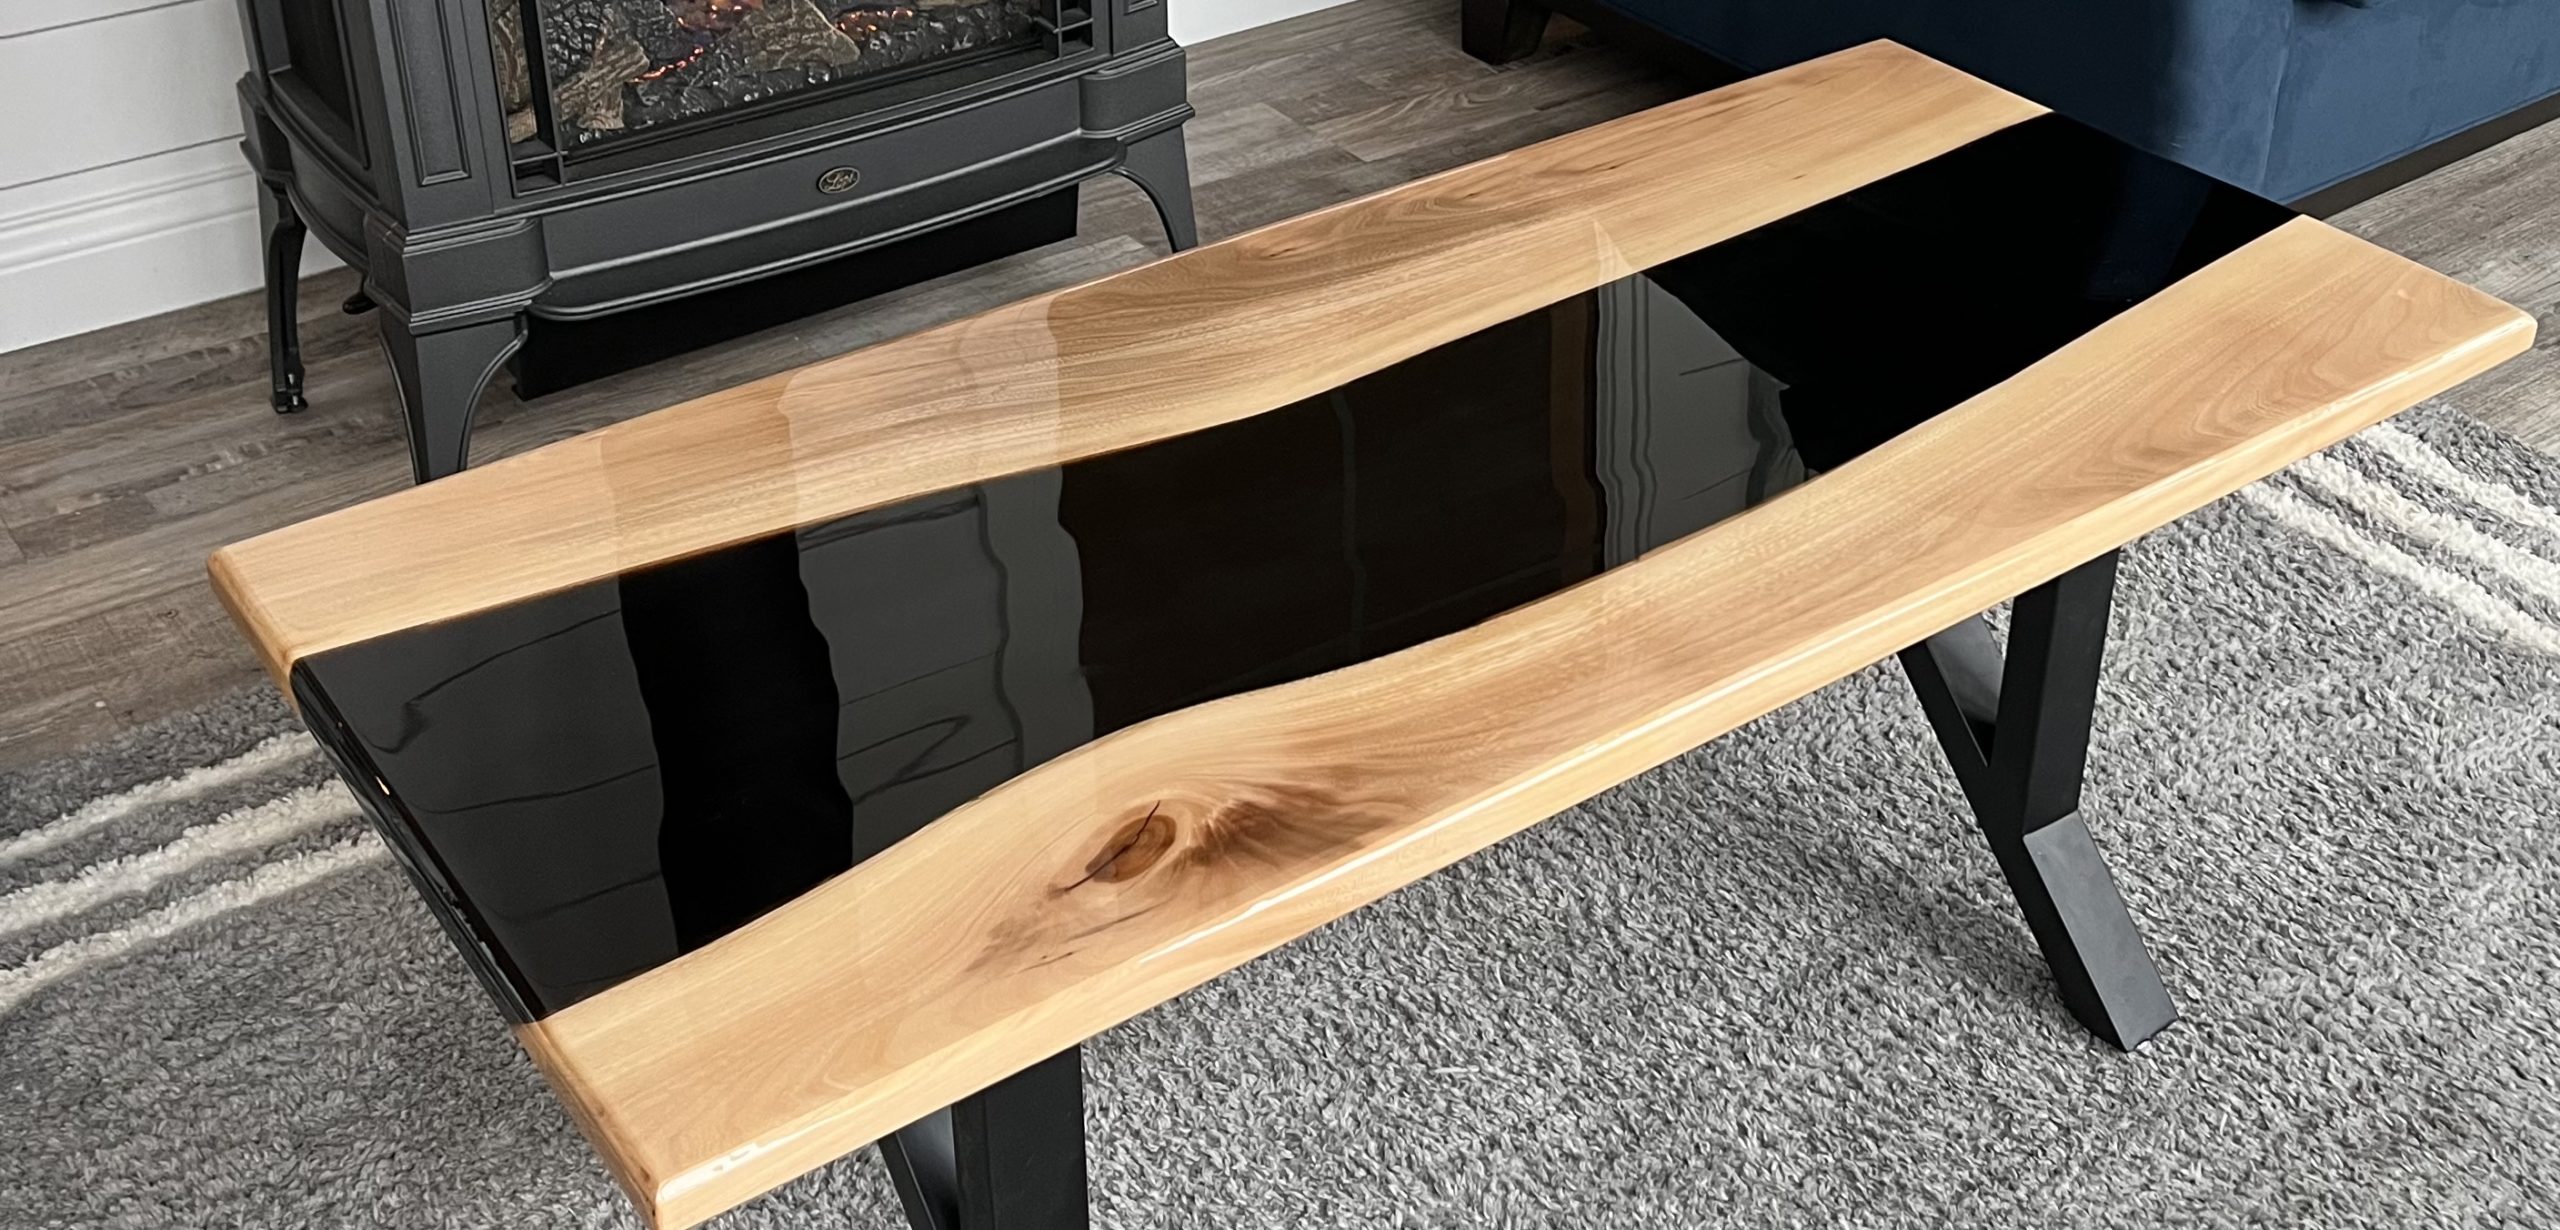
Table top epoxy is a versatile coating, sealant, and adhesive used in a wide range of DIY and professional projects. It’s a type of resin that, when mixed and applied to a surface, hardens into a durable, clear coating. Epoxy is commonly used to protect surfaces from wear and tear, as well as to enhance their appearance.

Super Epoxy Systems and its Products

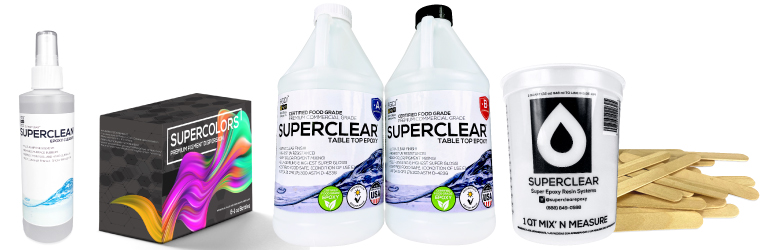
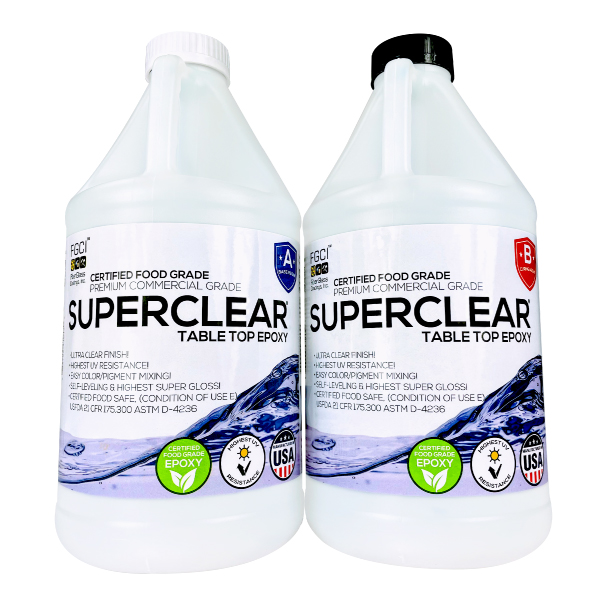
Super Epoxy Systems is a brand that specializes in manufacturing high-quality epoxy products for both DIY and professional use. Our products are designed to provide superior durability and a flawless finish, making them a go-to choice for those looking for reliable, long-lasting results.

With a wide range of products available, Super Epoxy Systems has something for every project and budget. Our products include clear epoxies, as well as adhesives, colorants, and other accessories. Additionally, we offer a variety of epoxy accessories, such as mixing cups and stir sticks, to make the process as easy as possible.

Table Top Epoxy Products

Understanding Table Top Epoxy

How is Epoxy Made and How Does it Work?

Table top epoxy is made up of two main components: a resin and a hardener. When these two components are mixed together, a chemical reaction occurs that causes the mixture to harden into a solid, clear coating. This coating is incredibly durable and resistant to scratches, stains, and heat.

Benefits of Using Epoxy for Table Tops

There are several benefits to using epoxy for table tops. First, as mentioned earlier, it’s incredibly durable and can withstand a lot of wear and tear. Additionally, it’s transparent, which means that it won’t hide the natural beauty of the wood or other materials underneath. Finally, epoxy is resistant to stains, making it an excellent choice for high-traffic areas.

Examples of Common Projects that Use Table Top Epoxy

Table top epoxy is used in a variety of projects, both for functional and aesthetic purposes. Some common examples include:

The possibilities are endless when it comes to using table top epoxy in your DIY or professional projects.

Superclear® Table Top Epoxy

At Super Epoxy Systems, we offer a range of high-quality epoxy products for all of your project needs. Our table top epoxy is a popular choice among DIYers and professionals alike, and it’s easy to see why.

Overview of Our Different Epoxy Products

In addition to our table top epoxy, we also offer a variety of other epoxy products, including deep pour epoxy, art resin, and more. All of our products are made with the same high standards and attention to detail, ensuring that you get the best possible results.

What Sets Our Table Top Epoxy Apart from Other Brands

There are several things that set our table top epoxy apart from other brands on the market. First, our epoxy is super clear, which means that it won’t yellow over time like some other epoxies. Additionally, our epoxy has a low odor and is VOC-free, making it safe to use in enclosed spaces. Finally, our epoxy is self-leveling and easy to apply, even for beginners. With our table top epoxy, you can achieve a smooth, flawless finish every time.

How to epoxy a table top?

How to Epoxy a Table Top

If you’re looking to epoxy a table top, it’s important to follow a few key steps to ensure that you get the best possible results. Here’s a step-by-step guide to help you through the process:

  • Prepare the Table Top – Start by cleaning and sanding the surface of your table top. Remove any debris, dust, or old finishes to create a clean, smooth surface. If there are any holes or cracks in the surface, fill them with CA glue or table top epoxy and let it cure.
  • Mix the Epoxy – Follow the instructions on your Super Epoxy Systems product to mix the epoxy resin and hardener. Be sure to measure carefully to ensure the correct ratio of resin to hardener.
  • Apply the Epoxy – Pour the mixed epoxy onto the table top and use a spreader, roller, or gloved hand to distribute it evenly across the surface. Be sure to work quickly to prevent the epoxy from hardening before it has a chance to level out.
  • Remove Bubbles – Use a heat gun or blow torch to remove any air bubbles that may have formed in the epoxy. Be sure to move the heat source quickly to prevent overheating and damage to the epoxy.
  • Let It Cure – Leave the table top in a dust-free environment to cure for at least 24 hours.

Tips for Achieving a Flawless Finish

  • Work in a well-ventilated area to avoid inhaling fumes.
  • Mix epoxy in small batches to ensure consistent quality.
  • Use a spreader, roller, gloved hand or brush to distribute epoxy evenly.
  • Use a heat gun or blow torch to remove air bubbles and create a smooth surface.
  • Take your time and work carefully to prevent mistakes.
Unique Ideas for Table Top Epoxy

Unique Epoxy Table Top Ideas

Epoxy table tops are not only functional but can also be used to create unique and personalized pieces. Here are some creative and unique ideas for epoxy table tops:

  • Using natural elements: Incorporating natural elements like wood, rocks, and shells into your epoxy table top can create a stunning, one-of-a-kind look.
  • Colorful designs: Experimenting with different color combinations and patterns can result in eye-catching and vibrant epoxy table tops.
  • Resin art: Mixing epoxy with acrylic paints or dyes can create beautiful and intricate designs that can be applied to a table top.
  • Glow in the dark: Adding glow in the dark pigments to epoxy can create a fun and unique table top that glows in low light settings.
  • Geometric designs: Using tape or stencils to create geometric shapes can give an epoxy table top a modern and sleek look.

By combining different techniques and materials, you can create a truly unique and personalized epoxy table top that will be the centerpiece of any room.

Ocean Resin Art

FAQ’s: Frequently Asked Questions About Table Top Epoxy

What type of epoxy is recommended for table tops?

Superclear® Table Top Epoxy is a recommended epoxy for table tops because it is specifically formulated to be crystal clear, self-leveling, and able to withstand heat, moisture, and impact.

How much can one expect to spend on a table top epoxy project?

The cost of a table top epoxy project varies depending on the size and complexity of the project, as well as the specific epoxy product being used. Typically, a high-quality epoxy such as Superclear® Table Top Epoxy will cost more than lower-quality alternatives, but will also provide superior results.

What distinguishes table top epoxy from regular epoxy, and which type is best for different projects?

Table top epoxy is a type of epoxy that is specifically designed to be used on surfaces that will be in contact with food, drinks, and other items. Regular epoxy, on the other hand, is not typically food-safe and may not be suitable for use on table tops or other similar projects. Superclear® Table Top Epoxy has been independently tested and FDA certified as a food grade safe product once completely cured, according to FDA 21 CFR 175.300, ASTM D-4236!

When choosing between table top epoxy and regular epoxy, it is important to consider the intended use of the finished product and choose the appropriate product accordingly.

Are table top epoxies prone to scratching?

Table top epoxies can be prone to scratching, particularly if they are not properly cured or are exposed to rough or abrasive surfaces. However, Superclear® Table Top Epoxy from Super Epoxy Systems is significantly more durable and harder than other epoxies on the market, making it less likely to scratch or show signs of wear over time. With proper care and maintenance, table tops coated with Superclear® Table Top Epoxy can maintain their beauty and functionality for years to come.

Conclusion:

In summary, table top epoxy is a popular material for both DIY and professional projects due to its durability, versatility, and ability to create a stunning finish. Super Epoxy Systems offers a range of high-quality epoxy products, including their Superclear® Table Top Epoxy, which stands out from other brands due to its excellent clarity and UV resistance.

Whether you are a seasoned pro or a DIY enthusiast, epoxy is a great material to work with and can be used in a wide range of creative projects. We encourage readers to get creative and experiment with different techniques and materials to create unique and personalized epoxy table tops. With Super Epoxy Systems’ high-quality products and our tips for achieving a flawless finish, you can create a beautiful and functional piece that will last for years to come.

Superclear Table Top Epoxy 2 Gallon Kit
Superclear Epoxy 1 Gallon Kit Epoxy Resin

14 Comments. Leave new

  • Hello. I am building a shuffleboard table. The playing surface is a slab of oak wood that has been sanded and cleaned to remove the old varnish. I am planning on staining the oak slab and then adding vinyl decals to mark the scoring areas before applying the epoxy. Would the table top epoxy be the best product that you sell for this application or would you recommend something different?

    Thanks

    Reply
    • Hey Sami! Yes, our table top epoxy would be perfect for this application. I would just make sure that the stain on the wood is not an oil based product. Oil and epoxy do not work well together! We typically use water based stains for our projects to avoid any kind of discoloration, softness, or inability to cure properly.

      Reply
  • I have used the table top epoxy on two serving trays, max. depth of 1/4″. The pour has taken more than two days to harden. I was very careful to mix the product correctly. What do you think I am doing incorrectly? Thanks

    Reply
    • Hey Dan, thanks for reaching out! Where are you located? Uncured epoxy can be due to a variety of issues, but some of the most common would be:

      1. Improper Mixing
      2. Off Ratio
      3. Ambient Temperature
      4. Volume
      5. Depth
      6. Surface Contaminant

      Feel free to give us a call at 888-849-0588 and we would love to hop on the phone and talk with you! Have a great one!

      Reply
  • I have been commissioned to resin a bar top on a raw wood plank…. What to do about a base coat???

    Reply
    • Hey there Noreen, congrats on the commission! I’m guessing the fear would be that when you attempt to pour your flood coat, the raw wood gasses out producing air bubbles in the pour. To combat this you can apply 2-3 seal coats to the surface. We have a fantastic video that breaks down this process up on our YouTube channel right now! Here’s the link: https://www.youtube.com/watch?v=Rzbyy9RPZR0 Please let me know if you have any other questions! Have a great one!

      Reply
  • Hello
    I’m making charcuterie boards.
    When filing holes with your epoxy in getting tiny pinholes after drying. I’ve tried sanding and using ca glue but I continue to have pinholes. Can you please advise.

    Reply
  • I’m doing tumblers, how many layers do I need to do?

    Reply
    • Debbie,

      You can use as many as you would like, and that’s the beauty of it! If you are wanting a true opaque based color, it is about the amount of pigment you add, and not the amount of epoxy. I hope that helps! If you ever have any tech questions, we are more than happy to help. Just call us at 888-849-0588 or email us at superclear@fgci.com!

      Reply
  • We have a bare wood countertop that will occasionally come in contact with food. It’s been installed, sanded and is dust free. Obviously, we’ll tape off the edges/corners and protect the floors. We’d love to go with your epoxy coating. What steps and product(s) would you recommend?

    Reply
    • Stephen Rodriguez
      January 8, 2024 9:31 am

      Hey Pete,

      Thanks for reaching out! I would recommend wiping down the surface with either our Superclean Epoxy Cleaner or Isopropyl Alcohol 90% or higher before you pour any epoxy.

      For a clear coating – I would pour a thin skim coat of our Superclear Table Top Epoxy and spread it out with a plastic scraper of some sort. If you put a decent amount of pressure as you spread the epoxy around the surface, it can really help to soak it into the pours of the wood.

      After 2-4 hours (once it has become hard but tacky) I’d come back for a final flood coat for some extra depth. You’ll typically get around an 1/8″ when the Table Top Epoxy self levels.

      Check out this video if you’d like a visual on how this process is done: https://www.youtube.com/watch?v=Rzbyy9RPZR0

      If you are looking to go for more of a pigmented/marble effect, you can always use our Countertop Epoxy instead. Here’s a great video on how that product works: https://www.youtube.com/watch?v=wSkwwjtHjiA

      Let me know if you have any other questions – have a great one!

      Reply
  • Jonathan Oldner
    March 18, 2024 1:39 pm

    Yes I am making crackle effect coasters and I need to know which viscosity this is. I have had great experiences with this product. I love it. But my coasters have not turned out like I wanted. I need to be using a medium viscosity resin. Maybe I need to be using a different one of your products or maybe I did something wrong when I made them? Thanks for your time.

    Reply
    • Stephen Rodriguez
      April 3, 2024 8:36 am

      Hey Jonathan,

      I’m sorry to hear that you’ve been having trouble getting your coasters to turn out how you want.

      What is the specific application or look that you’re going for?

      I’m more than happy to go back and forth here, but for a quicker answer to your question I highly recommend giving us a call directly at 888-849-0588.

      Our technical staff is more than happy to help sort this out 👍

      Reply

Leave a Reply

Your email address will not be published. Required fields are marked *

Fill out this field
Fill out this field
Please enter a valid email address.
You need to agree with the terms to proceed

Menu